This Class is full and the waitlist is as well, please check out the classes from the other instructors!
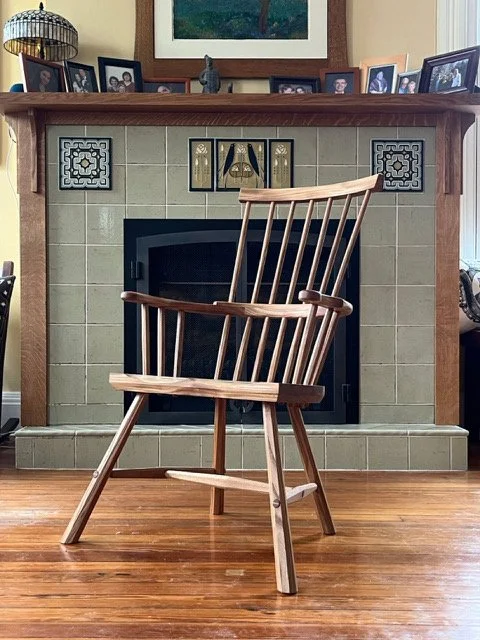
Build a comb-back stick chair using common materials and everyday tools – plus a variety of simple methods. Stick chairs are a vernacular form of furniture that was built by farmers or part-time woodworkers. The chairs were made using the materials around the woodworker (green wood, dry wood, salvaged wood, found wood, whatever), and simple bench tools. Despite these limitations, stick chairs have a rugged beauty and a somewhat animalistic nature.
In this class we’ll build comb-back stick chairs – one of the most common forms. The construction process involves heavy hand-tool use with assistance from an electric drill. The emphasis is on building beautiful chairs with a few tools, a few measurements and two eyeballs.
This comb-back is built entirely with dry wood. The legs and stretchers are drilled and shaped by eye, then joined to the seat with cylindrical tenons. The arm is what is called a “pieced armbow” – made from four joined components to avoid short grain and add lumbar support. The seat is lightly saddled – most of the comfort of this chair comes from the angle of the back sticks and the seat. The sticks are shaved to shape using a block plane and a simple piece of scrap (no shavehorse required). And the comb is cut from solid 8/4 material.
All parts are joined with animal glue. And we’ll finish the chair with shop-made paint or an oil/wax blend.In addition, students will explore the idea that no two stick chairs should be identical. You’ll be encouraged to bring your own ideas forward with your chair to make something that is both yours and also fits within the tradition of stick chairs that goes back to the 15th century.
This class is open to students of all skill levels. It is a physically challenging class, with heavy handplane and spokeshave use. No prior chairmaking experience is required, though some experience with sharpening and using edge tools is encouraged.
Tuition is $2000
Reservations will be first come first serve. A deposit of $ 1000 is due upon enrollment.
Tool List
Block plane
This is one of the most essential tools in the kit. I recommend a high-quality new one with an adjustable mouth, such as the Lie-Nielsen 60-1/2. The adjustable mouth will allow you to make against-the-grain cuts without tearing. If you have small hands, you can substitute a smaller model with a non-adjustable mouth. But you will be doing a lot more scraping.
Jack plane
Another essential tool. I recommend a vintage metal jack, such as a pre-war Stanley No. 5. The older ones weigh less than the new premium jacks, which is a good thing. And the handles are far more comfortable. If possible, grind the iron so it has a pronounced curve, such as an 8” or 10” radius. If you don’t have a grinder,a sharp, straight edge will work.
Spokeshaves, flat sole and curved sole
I am partial to shaves in the Stanley No. 151 pattern. These shaves have two blade adjustment screws. Veritas makes the best new ones. We will be working with dry wood, so wooden-bodies shaves are not ideal.
6” rule
Small tape measure
Sliding bevel
Combination square (6” or 12”)
Card scraper (we recommend the curved one we make at Crucible)
Mechanical pencils (.9mm or .7mm lead)
10” or 12” Cabinet rasp, medium coarseness, such as 10 or 12 grain. If you have a finer rasp (such as the
modeller’s rasp 15 grain or so, bring it). Auriou is my favorite brand
Scorp (I recommend the Lucian Avery Inshave, the Hans Karlsson Inshave or the one from Jason Lonon).
Order early to avoid disappointment!
Travisher (Elia Bizzari’s 4.5” radius travisher, Peter Galbert’s T2 and the travishers from Allan Williams are all excellent). I also like the travishers from Windsor Workshop. If you use the Windsor Workshop travisher (particularly the Delrin one) then you don’t really need a scorp.
Crosscut back saw (Western or a simple dozuki)
Cork sanding block
Flush-cutting saw (I’ve never encountered a great one; this one is pretty good)
A ½” chisel
Wooden yardstick
Mallet (heavier is better for chairmaking). I like 2-1/2” lbs.
Bubble level (any size will do except huge ones for carpentry).
Cordless drill. If you have a big one (18v to 20v), please bring it. If you need a recommendation to buy, we use the DeWalt 20v drills with metal chucks. They are usually made in the USA.
Random-orbit sander. If you have a 5” one, please bring it. Also useful: a 3M soft sanding pad. Bring #80 and #120 grit discs if you can.
OPTIONAL
If you have any of these tools already, it would be helpful to bring them. I’ll have these, but if we have more, it will bean less waiting for tools.
Veritas Power Tenon Cutters. We’ll use the 5/8” and 1” tools
Wood Owl 1” auger bit
COVID Policy
We recommend each student traveling for the workshops carry travel insurance in the event their trip is cancelled due to contracting the virus. In the unfortunate situation a class is cancelled or missed due to illness, the class will be rescheduled not refunded.
For questions or to reserve a spot, contact peter@petergalbert.com